The first thing to do is set up a build environment. The Board support package that Intel supplies comes with a vast set of instructions and a three stage build process that uses the standard edk2 build to create firmware volumes, rips them apart again then re-lays them out using spi-flashtools to include the Arduino payload (grub, the linux kernel, initrd and grub configuration file), adds signed headers before creating a firmware flash file with no platform data and then as a final stage adds the platform data. This is amazingly painful once you’ve done it a few times, so I wrote my own build script with just the essentials for building a debug firmware for my board (it also turns out there’s a lot of irrelevant stuff in quarkbuild.sh which I dumped). I’m also a git person, not really an svn one, so I redid the Quark_EDKII tree as a git tree with full edk2 and FatPkg as git submodules and a single build script (build.sh) which pulls in all the necessary components and delivers a flashable firmware file. I’ve linked the submodules to the standard tianocore github ones. However, please note that the edk2 git pack is pretty huge and it’s in the nature of submodules to be volatile (you end up blowing them away and re-pulling the entire repo with git submodule update a lot, especially because the build script ends up patching the submodules) so you’ll want to clone your own edk2 tree and then add the submodule as a reference. To do this, execute
git submodule init
git submodule update --reference <wherever you put your local edk2 tree> .module/edk2
before running build.sh; it will save a lot of re-cloning of the edk2 tree. You can also do this for FatPkg, but it’s tiny by comparison and not updated by the build scripts.
A note on the tree format: the Intel supplied Quark_EDKII is a bit of a mess: one of the requirements for the edk2 build system is that some files have to have dos line endings and some have to have unix. Someone edited the Quark_EDKII less than carefully and the result is a lot of files where emacs shows splatterings of ^M, which annoys me incredibly so I’ve sanitised the files to be all dos or all unix line endings before importing.
A final note on the payload: for the purposes of UEFI testing, it doesn’t matter and it’s another set of code to download if you want the Arduino payload, so the layout in my build just adds the EFI Shell as the payload for easy building. The Arduino sections are commented out in the layout file, so you can build your own Arduino payload if you want (as long as you have the necessary binaries). Also, I’m building for Galileo Kips Bay D … if you have a gen 2, you need to fix the platform-data.ini file.
An Aside about vga over serial consoles
If, like me, you’re interested in the secure boot aspect, you’re going to be spending a lot of time interacting with the VGA console over the serial line and you want it to look the part. The default VGA PC console is very much stuck in an 80s timewarp. As a result, the world has moved on and it hasn’t leading to console menus that look like this
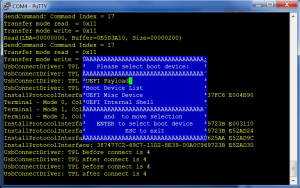 This image is directly from the Intel build docs and actually, this is Windows, which is also behind the times1; if you fire this up from an xterm, the menu looks even worse. To get VGA looking nice from an xterm, first you need to use a vga font (these have the line drawing characters in the upper 128 bytes), then you need to turn off UTF-8 (otherwise some of the upper 128 character get seen as UTF-8 encodings), turn off the C1 control characters and set a keyboard mapping that sends what UEFI is expecting as F7. This is what I end up with
xterm -fn vga -geometry 80x25 +u8 -kt sco -k8 -xrm "*backarrowKeyIsErase: false"
And don’t expect the -fn vga to work out of the box on your distro either … vga fonts went out with the ark, so you’ll probably have to install it manually. With all of this done, the result is
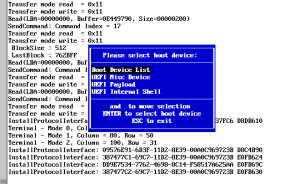 And all the function keys work.
Back to our regularly scheduled programming: Secure Boot
The Quark build environment comes with a SECURE_LD mode, which, at first sight, does look like secure boot. However, what it builds is a cryptographic verification system for the firmware payloads (and disables the shell for good measure). There is also an undocumented SECURE_BOOT build define instead; unfortunately this doesn’t even build (it craps out trying to add a firmware menu: the Quark is embedded and embedded don’t have firmware menus). Once this is fixed, the image will build but it won’t boot properly. The first thing to discover is that ASSERT() fails silently on this platform. Why? Well if you turn on noisy assert, which prints the file and line of the failure, you’ll find that the addition of all these strings make the firmware volumes too big to fit into their assigned spaces … Bummer. However printing nothing is incredibly useless for debugging, so just add a simple print to let you know when ASSERT() failure is hit. It turns out there are a bunch of wrong asserts, including one put in deliberately by intel to prevent secure boot from working because they haven’t tested it. Once you get rid of these, it boots and mostly works.
Mostly because there’s one problem: authenticating by enrolled binary hashes mostly fails. Why is this? Well, it turns out to be a weakness in the Authenticode spec which UEFI secure boot relies on. The spec is unclear on padding and alignment requirements (among a lot of other things; after all, why write a clear spec when there’s only going to be one implementation … ?). In the old days, when we used crcs, padding didn’t really matter because additional zeros didn’t affect the checksum but in these days of cryptographic hashes, it does matter. The problem is that the signature block appended to the EFI binary has an eight byte alignment. If you add zeros at the end to achieve this, those zeros become part of the hash. That means you have to hash IA32 binaries as if those padded zeros existed otherwise the hash is different for signed and unsigned binaries. X86-64 binaries seem to be mostly aligned, so this isn’t noticeable for them. This problem is currently inherent in edk2, so it needs patching manually in the edk2 tree to get this working.
With this commit, the Quark build system finally builds a working secure boot image. All you need to do is download the ia32 efitools (version 1.5.2 or newer — turns out I also didn’t compute hashes correctly) to an sd card and you’re ready to play.